This post is for you if…
- You’re trying to figure out your best option to bring in antique mirror finishes to your home
- You want an breakdown of the options out there for foxed (antique) mirror decor
- You’re not afraid to DIY, but you want to know what you’re getting yourself into
Hate the story but want the exact sources?
→ shop the project now
Some links may be affiliate links, meaning I may earn a small commission if you choose to purchase — at no additional cost to you. I only share products I genuinely like, would use in my own home, or have researched and feel confident recommending.
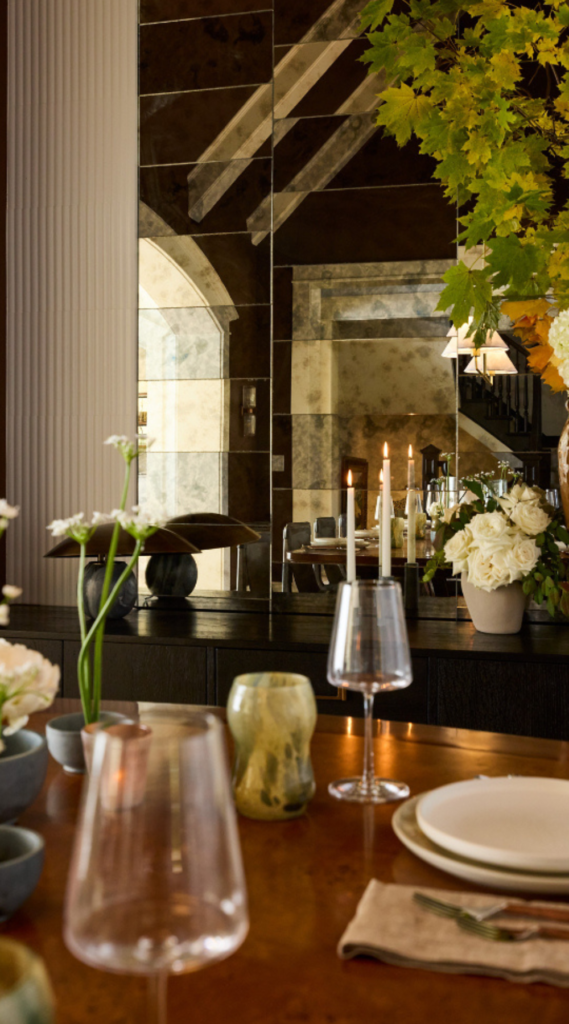
We Aren’t Really DIYers
But the most-asked-about thing in our living room is something we DIYed.
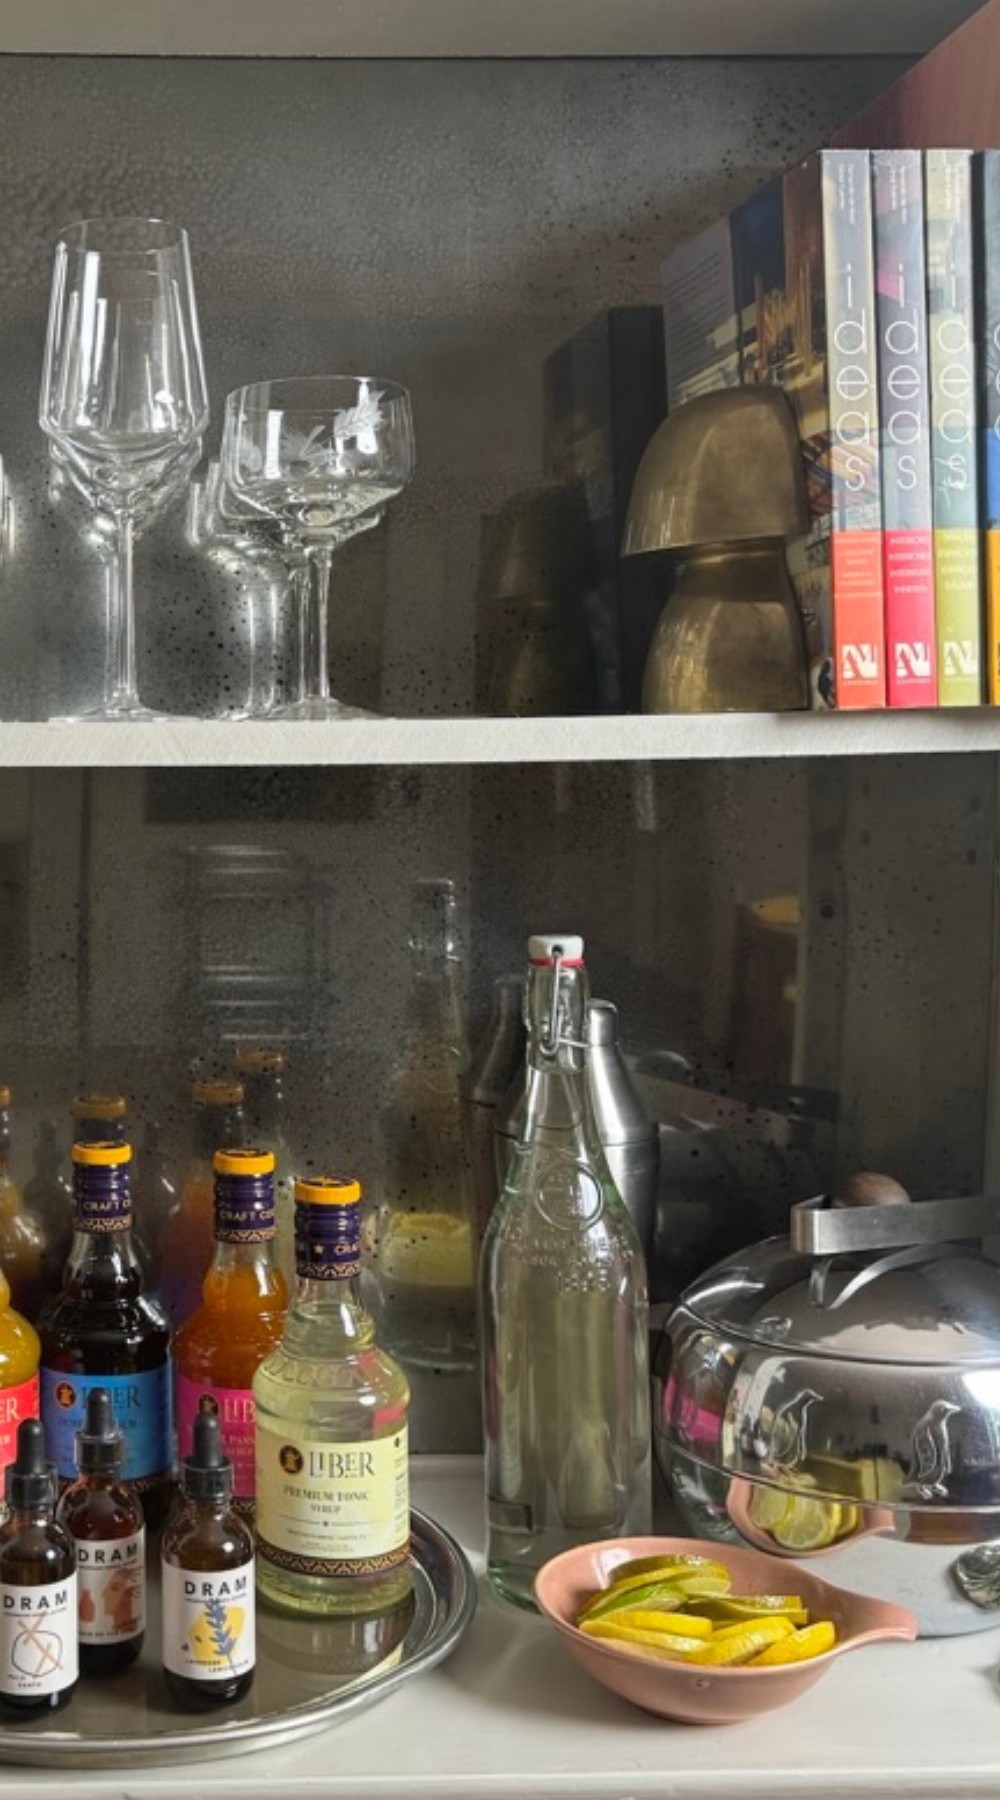
The back panel of the built-in shelves that span our living room most people assume is antique mirror glass. The antique-y, warm, spotted, slightly cloudy finish makes the room look like it’s been in place since the house was built in 1924.
But it’s acrylic sheeting. Mirror spray paint. White vinegar. And a little gold and black spray paint. And we did it ourselves (thanks, HGTV Home & the magic that is “YouTube University“!)
It wasn’t cheap, with a total cost of about $660 to complete the four large bookcases spanning the entire room. But real antiqued mirrored glass professionally installed would have been many (many) times more than that.
Why We Didn’t Buy Real Antiqued Mirror Glass
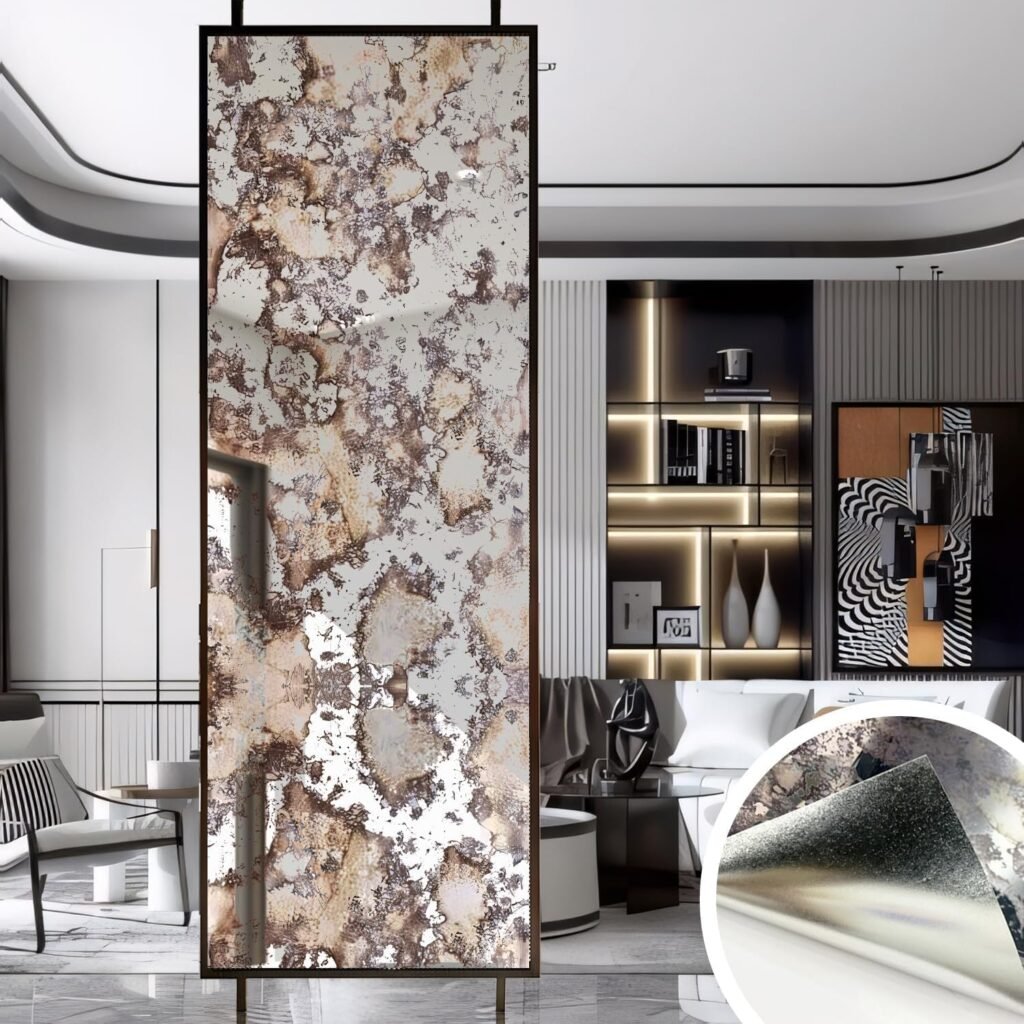
Foxed mirror glass (also called antiqued mirror glass) is genuinely stunning and genuinely available.
It’s also genuinely expensive, and in a 1924 house where nothing is square and no two openings are exactly the same size, would have also required professional measuring and installation. We priced it out. We were shocked. We moved on.
Before we landed on the DIY approach, we looked at three other options:
Option 1: Real Antiqued Mirror Glass Tiles
I’d call this option the next best option after a single sheet of mirror glass, professionally installed.
Glass antique mirror tiles are gorgeous.
They’re available in multiple sizes, at multiple tile shops.
If budget isn’t a huge constraint and your openings are standard sizes, and you’re open to the tile look, this might be a great option for you.
For us, tiles were still too expensive, too complicated, and we were really looking for a seamless look for our room.
The Splurge Pick: Patina Eclipse Mirror Wall Tile by Kelli Fontana at The Tile Shop stunning for backsplashes, niches, or fireplace surrounds where you’re tiling anyway.
Want to skip ahead? → shop the project now
Option 2: Antiqued Mirror Film (Peel & Stick)
This is the easiest, least expensive option we found.
It’s peel and stick, self-install, no cutting required beyond trimming to size.
Yes, it’s less convincing up close than the DIY acrylic method, but for smaller applications like the back of a cabinet or a powder room niche, it could turn out to be the perfect option.
Plus, the relatively low cost makes trying it low risk.
One of the more economical options we found: LiveInUrban Vintage Foxed Antique Chrome Reflective Wallpaper comes in 22.8″ x 78.7″ and 39 x 15. Reviewers recommend using tile adhesive for wall applications to improve results.
Option 3: DIY Acrylic Faux Antique Mirror (What We Did)
My take, it’s the most customizable option for old houses where nothing is standard size.
This will take more DIY effort than window film, but the end-result look gives that depth we were craving.
And it’s much (much) less expensive than real glass or tile, with a result that’s almost indistinguishable in context.
How We Did It
When we found this option on YouTube, we knew we had to try it. Literally thousands of dollars less than glass panels or tile, it was a perfect, low risk way to confirm this was even a look we’d want to live with.
Want to skip ahead? → shop the project now
Phase 1: The Cuts (aka The Worst Part)
If you live in an old house, you already know: nothing (NOTHING) is square. Nothing is the same size twice. Our four bookcases looked identical and were absolutely positively not identical. Every panel had to be measured and cut individually. If you have to cut holes for outlets or light fixtures, this is the time to do it.
For smaller panels, an acrylic scoring tool would probably work just fine. For our large panels (48″x96″ 1/8″ acrylic sheets we cut to fit ), we ended up using our circular saw with a blade for acrylic/plastic.
Fair warning: on long cuts, the blade can still heat up enough burr the edge of the acrylic. It’s not pretty up close. For our application, that didn’t matter too much, because the edges got tucked behind the shelving frame and aren’t in plain view.
Measure twice. Accept that old house math is its own discipline. Cut.
Phase 2: DIYing the Mirror Effect (aka The Fun Part)
We did this one sheet at a time – again just because our sheets were so large. If there’s a plastic film on your panels, remove it from one side (this will be the side you paint).
- Clean the acrylic on the film-free side
- Spritz a 50/50 vinegar/water mixture over the acrylic sheet in quick bursts. Make it imperfect. These droplets become your “antique” look, creating the spotting, clouding, and variation to mimics natural oxidation. More vinegar = more dramatic foxing. Think about where wear happens on mirrors, concentrating in corners and edges.
- Add mirrored spray paint shake your mirror finish spray paint well, and then add a light coat to the spritzed acrylic sheet. Work quickly and in layers, painting the silver paint over the vinegar/water droplets.
- Use your paper towel to lightly blot up the vinegar/water droplets. These clear spots will become your “oxidization”.
- (Optional) Add a very light, very random layer of gold/bronze metallic spray paint this is our addition to the HGTV tutorial . We wanted to add warmth and a slightly coppery tone that reads as age rather than spray paint. Less is more on this step. Stand back and dust it on.
- Finish with matte black spray paint again, light and random. This creates the depth and the darker pooling you see in genuine antique mirror. It also unifies the panels so they read as a set.
Let each panel dry completely and admire your creativity.
Phase 3: Installation (aka The Pay Off)
We’d originally planned to use hook-and-loop strips to hang the panels in each shelving unit. Unfortunately, they were too bulky, creating a visible gap between the panel and the back of the shelving. So we switched to Gorilla Heavy Duty Mounting Tape and it was completely straightforward. No alignment issues, nothing to line up, and hasn’t moved since.
Wrangling large acrylic sheets into a bookcase opening is a two-person job. If you’re DIYing large sheets, get some help and get ready to wrangle.
The Result
When we installed these panels, we thought it was a temporary fix. The plan was to replace them with real antiqued glass once we were sure it was a look we wanted to live with (and something that justified the cost).
That was four years ago. We haven’t replaced them. And we’re not going to.
In context … behind glassware, and decor, in a room with brass and books and original 1924 woodwork, nobody really gets close enough to tell the difference. The panels have warmth and variation and age.
In other words, they do exactly what we needed them to do. The next project for this room is heavier duty shelves and library lights across all four bookcases which we’ll tackle when we rewire the room.
Would we do this project again?
Absolutely yes! This is one of those projects that was not so hard that we regretted it during and looked even better than we’d hoped after. That’s a highly rare combination of happenstances, in my DIY experience.
Shop the project
Some links may be affiliate links, meaning I may earn a small commission at no additional cost to you.
- Art3d Acrylic/Plexiglass Sheets your base material
- Acrylic Sheet Cutter great for scoring and snapping if you’ve got smaller cuts
- Rust-Oleum Mirror Spray Paint for your mirror coats
- Rust-Oleum Metallic Gold Spray Paint (optional) if you want to warm it up a little
- Rust-Oleum Matte Farmhouse Black your finishing layer
- Gorilla Heavy Duty Mounting Tape worked great for us (for years!)
- LiveInUrban Foxed Mirror Film the easier (cheaper) alternative
- Patina Eclipse Mirror Tile (Tile Shop) a splurge option in spaces meant for tile
Frequently Asked Questions
What is foxed mirror glass?
Foxed mirror glass refers to the warm, spotted, slightly cloudy appearance that develops as the silver backing on antique mirrors ages and oxidizes over time. It’s highly sought after in historic home interiors because it adds apparent age and warmth. It’s now reproduced commercially — and can be DIY’d at a fraction of the cost.
Can you use real glass instead of acrylic to DIY an antique mirror finish?
SURE! And the result will be more convincing up close. Acrylic is lighter, easier to handle, and far more forgiving to cut, especially for large panels or odd sizes in old houses where nothing is standard. For large built-in applications, we’d use acrylic again without hesitation.
How do you cut acrylic sheets to size?
A scoring tool can work for smaller cuts. For larger panels, a circular saw or table saw with a plastic blade is faster, but be aware that on long cuts the blade can still heat up enough to melt and burr the edge. It doesn’t affect the finished look if edges are hidden, but it’s worth knowing going in.
How do you install acrylic mirror panels in shelving?
We used Gorilla Heavy Duty Double-Sided Mounting Tape. We tried hook-and-loop strips first but they were too bulky for our space and created a visible gap. The mounting tape is completely flush, nothing to align, and hasn’t moved since installation.
How much does DIY foxed mirror cost?
For our project which included creating mirrors for four large built-in bookcases in a 1924 center-hall colonial, we spent approximately $600 on 1/8″ thick acrylic sheets and about $60 on paint, tape, and supplies. All in: roughly $660 for the entire room at the time we DIYed.
Real antiqued glass professionally measured and installed for the same space would have cost several times that, with the added complication of custom cutting for non-standard openings. For smaller projects, the material cost is proportionally lower.