This post is for you if…
- You’re shopping cabinet hardware and the placement decisions are tripping you up
- You want hardware that reads period-appropriate without looking museum-y
- Your cabinets deserve the right knobs or pulls in the right spot, and you don’t want to regret your choices
Hate the story but want the exact sources?
→ Skip to the full shop section
If You Only Look at Five Cabinet Hardware Options, Consider These
Some links may be affiliate links, meaning I may earn a small commission if you choose to purchase — at no additional cost to you. I only share products I genuinely like, would use in my own home, or have researched and feel confident recommending.

What we chose in the Laundry Room at Rosemont
Massey Drawer Pull, Rejuvenation $24–$38, Rejuvenation
What I’ve got in the laundry room and recommend without hesitation. Substantial weight, ages well, period-appropriate proportions.
Antique Brass 1.1″ Knurled Knobs Under $20 (set), Amazon
The texture solves the “too plain” problem on a small knob. Knurled detail reads as character, not loud.
Antique Brass Cabinet Handles (6-Pack) Budget-friendly, Amazon
The traditional shape that doesn’t compete with cabinetry detail. Budget friendly, so you can buy confidently in multiples.
Bronze Knurled Solid Brass Cabinet Handles Mid-range, Amazon
The compromise pick when you want classic shape with a touch of modern tension. The knurl earns its place.
Top Knobs Handle/Pull Backplate Various finishes, Amazon
Solves drill-hole problems and adds visual weight. Buy these before you replace the actual hardware — they may be enough.
BONUS “Worth-It” Tool | A Cabinet Hardware Jig Under $30, Amazon
3,000+ reviews and a 4.5 star rating. Don’t measure twice and drill once without it. The fastest way to get every drawer pull at the same height.
→ Jump to the full shop section for backplates, knobs, and pulls organized by style.
Cabinet Hardware Is the Jewelry. Placement Makes the Whole Outfit Work.
Cabinet hardware gets called the jewelry of the kitchen, the bathroom, the laundry room. The analogy holds — but the part that actually decides whether the room reads “finished” isn’t just the style of the hardware. It’s the placement.
The right hardware in the wrong spot reads off. The wrong hardware in the right spot reads better than you’d expect. And the same hardware on adjacent cabinets, placed inconsistently, will silently undermine an otherwise great design.
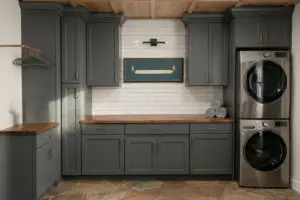
When we moved into Rosemont, we were thrilled to learn the current laundry room is the home’s original master bathroom. It’s been completely reborn with new cabinetry, floor-to-ceiling subway tile, and deep blue cabinets. There was no hardware on the cabinets when we moved in, and at first I told myself it looked fine.
After a few weeks of touching wet, soapy, painted cabinet faces with my hands, I bought the Massey pulls from Rejuvenation. The room felt done the day they went on. And not because the pulls themselves are showy — they’re not. It’s because they were placed exactly where the drawers and doors expected them.
That’s what the right hardware, in the right spot, does.
Almost effortlessly.
This guide covers the rules that decide where the hardware should go, the math behind drawer pull spacing, the decision between knobs and pulls, why backplates solve five problems most people don’t realize they have, and the mistakes that quietly date a room’s design.
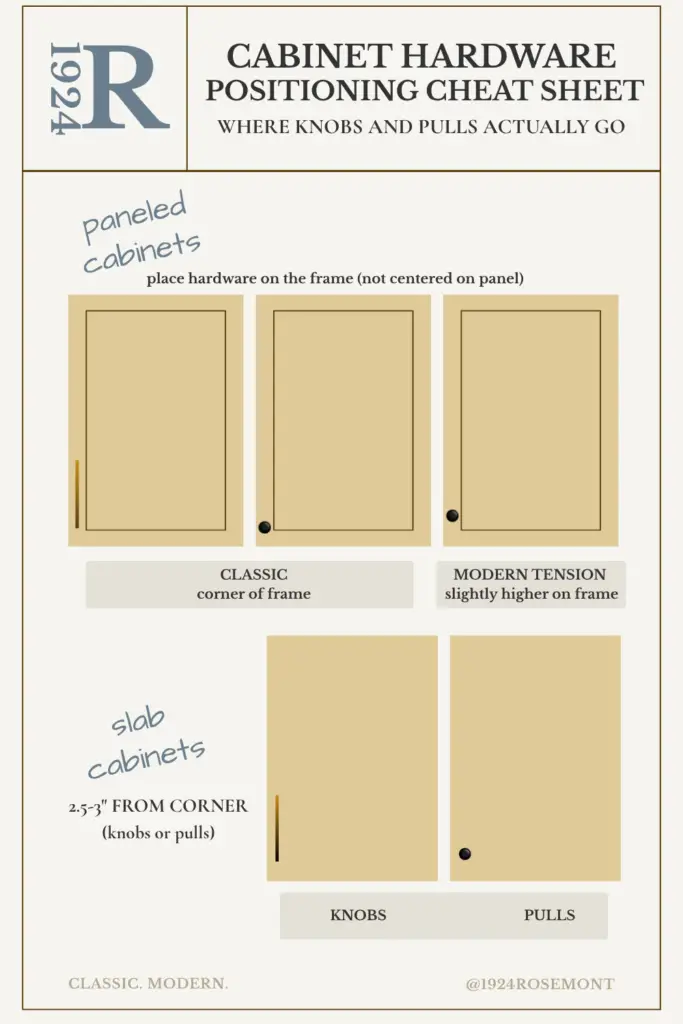
Where Should Cabinet Pulls Go on Shaker (and Other Paneled) Doors?
Paneled cabinetry — Shaker, traditional, beaded inset — has a visible frame around each door. That frame is where the hardware goes.
Two placements work. Pick one and commit across the whole room.
via @1924rosemont
Classic Placement
Aligns with the corner of the frame.
The hardware sits at the corner of the cabinet frame, level with the bottom of the rail (on a top cabinet) or the top of the rail (on a base cabinet). It’s the conservative (not at all boring) move.
It reads period-appropriate, balanced, and intentional.
And it’s what most century homes were finished with originally, and it doesn’t try to do anything clever.
Old House Rule: If you don’t know what to pick, choose classic hardware placement.
Modern Tension Placement
Sits slightly higher on the frame.
The hardware moves up the rail by an inch or two. The visual effect: the cabinets feel taller. The room reads slightly more current.
The detail is small, but the impression isn’t.
This works when: the cabinetry is on the more contemporary side of traditional.
Or when you want the room to feel a touch lighter without changing anything else.
The non-negotiable
Pick one placement style (Classic or Modern Tension) and use it on every paneled door in the room.
Cabinets with mixed placement styles are a pretty common mistake in DIY hardware projects – one that our eye picks up immediately even if we can’t name exactly what’s wrong.
Where Should Hardware Go on Slab (Flat-Front) Cabinet Doors?
Slab cabinet doors don’t have a frame, so there’s no rail to align to. So hardware placement gets measured from the corner.
The rule of thumb: 2.5–3 inches from the corner, both vertically and horizontally. Knobs and pulls follow the same spacing rule.
This measurement keeps the hardware visually balanced on the door and comfortable for your hand. Closer than 2.5″ can feel cramped; farther than 3″ feels disjointed.
For tall cabinet doors (pantry, broom closet), keep the placement at the standard 2.5–3″ — don’t migrate it down toward the middle of the door.
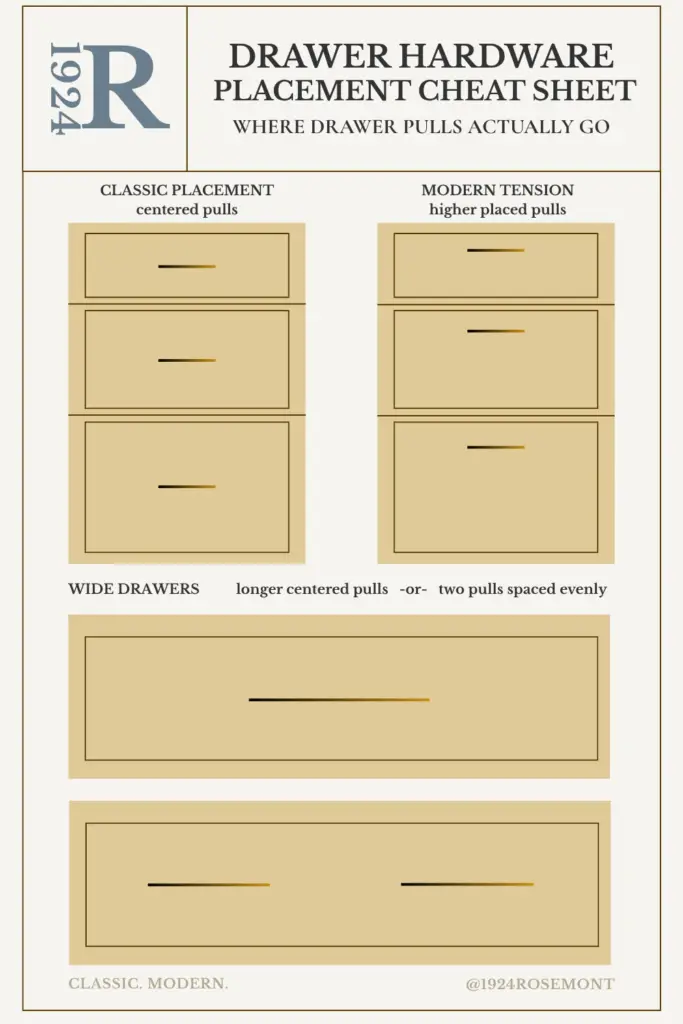
Drawer Pull Placement: The Real Rules (Plus the Math)
Drawer hardware placement decisions don’t need to be so mysterious. Here’s the full breakdown.
via @1924rosemont
Standard drawers (under 24″ wide)
A single pull or knob, centered horizontally and vertically.
The math: measure the drawer face, mark the exact horizontal center, then choose:
- Centered placement (vertically): pull aligned to the geometric center of the drawer face. Reads classic, safe, balanced.
- Modern tension placement: pull placed slightly above center — generally between the top third and the geometric middle. Reads more contemporary; lifts the drawer visually.
Pick a placement and use it across every drawer in the run. Mixing placements within a stack of drawers is the second most common mistake (after mixing on adjacent doors).
Wide drawers (24″+)
A single pull starts to feel underweight on a wide drawer. Two options:
Option 1: One longer pull.
A standard guideline is the pull length being roughly 1/3 of the drawer’s total width. A 30″ drawer takes a 10″ pull. A 36″ drawer takes a 12″ pull. This is the cleanest move and keeps the drawer reading as one piece.
Option 2: Two pulls, spaced evenly.
Center each pull on the half-line of the drawer. So on a 36″ drawer, your two pulls’ centers should sit at 9″ and 27″ from the left edge (the quarter-points). Not the third-points. Not “approximately even.” The eye knows the difference.
Two pulls reads more architectural and is easier to grab on a heavy drawer. One long pull reads more period-correct.
Stacked drawer banks (kitchens, bathroom vanities)
The drawers in a stack should all use the same hardware type (all pulls or all knobs), and the same placement convention (all centered, or all modern-tension). Don’t combine knobs on the top drawer with pulls below — it reads as if you ran out of one halfway through.
At Rosemont: the laundry room drawers all carry Massey pulls, centered, single pull each. The proportion is right because the drawers are standard-width; if any of them were wider, I’d switch to two pulls or a longer single.
Knob vs. Pull: The Hardware Decision in One Sentence
Default rule: knobs on doors, pulls on drawers. Or pulls everywhere for a consistent, slightly more architectural read.
Both work. The decision comes down to whether you want the room to read “traditional” (mixed knobs + pulls) or “intentional” (pulls everywhere).
- Knobs feel more period-correct in a true old house, especially on paneled doors.
- Pulls are more architectural and are easier to grab when your hands are full (or covered in flour, paint, or mineral spirits). This messy cook votes for pulls on every drawer. All the time.
- Mixing types on the same surface category is the mistake. Knobs on some doors, pulls on others, in the same kitchen, with no rule? That’s where a cohesive design loses the plot.
If you want a deeper dive on cabinet knobs and pulls let me know! I’d love to keep nerding out over this common design dilemma.
Related → How to Choose: Chrome vs Brass in an Old House
Backplates Solve Five Cabinet Hardware Problems
Backplates are the most under-used cabinet hardware move. They’re (relatively) cheap, they’re forgiving, and they solve problems most people don’t even notice they have.
The solved-by-backplates problems:
- Drill holes from a previous owner’s hardware that don’t match the new pulls’ centers. A backplate covers them. No filler and refinish needed.
- Hardware that reads a bit undersized for the cabinet face. A backplate adds visual weight without changing the actual hardware.
- A cabinet finish that’s getting beat up around the hardware (fingerprints, wear). Backplates protect the surface.
- An old kitchen you’re refreshing rather than replacing. Backplates can change the look without ripping out cabinets.
- Period authenticity on a transitional kitchen. Layered hardware details — knob + backplate — read as old-house care; just a knob alone often doesn’t.
Can you tell I’m a huge fan of backplates?
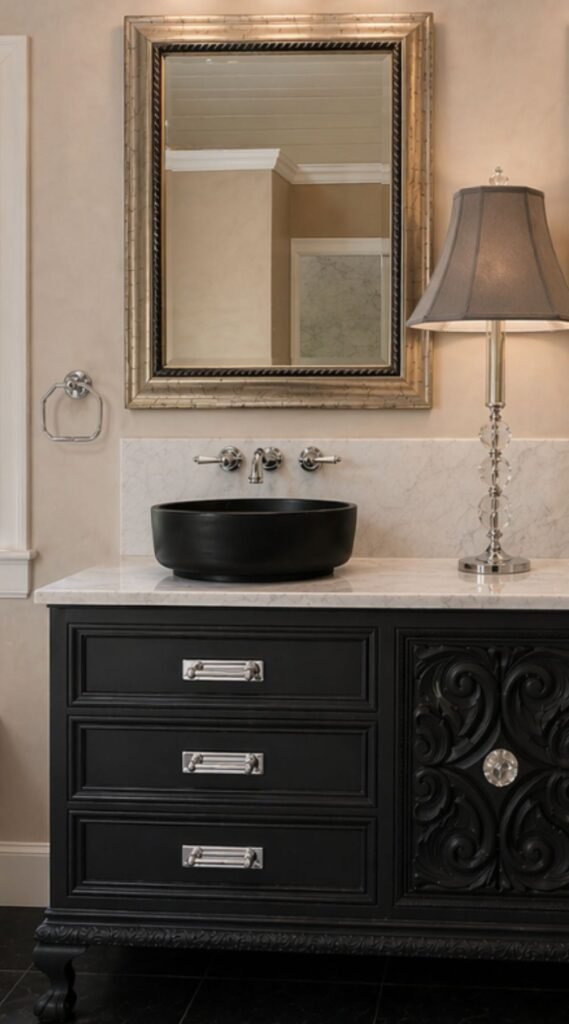
We added backplates in our guest room bath because we loved the vintage dresser that acts as the vanity, but hated the pulls. We didn’t want to do a major restoration, so we went the lazy, layered route and love the look it delivered.
The backplate-and-replacement-knob route delivered 80% of the look with 0% of the refinishing work.
And we ultimately chose backplates for our master bathroom renovation, too. We’ve got a refinished dresser acting as a vanity in that room as well, and I didn’t want to worry about wear and tear at the drawer pull.
Five “Don’t Do This” Cabinet Hardware Mistakes
Our eye registers these “Don’ts” within seconds, any one of these can steal the glory from a beautifully chosen hardware finish.
- Mixed placement across adjacent doors. Classic on one, modern tension on the next. The eye picks it up before it knows why.
- Hollow, lightweight hardware on cabinets you touch every day. Even an expensive-looking finish can’t compensate for the wrong feel in the hand. Solid brass or bronze for high-touch zones; save lighter options for guest rooms or low-use cabinets.
- A pull that’s too short for the drawer width. A 6″ pull on a 30″ drawer looks accidental. Use the 1/3 rule, or two pulls.
- Slab placement that drifts from the 2.5–3″ corner rule. “Close enough” isn’t, on a flat front. The eye reads the off-by-half-inch as off-balance.
- Modern tension placement on a frame that doesn’t have the room. Some paneled cabinets have a narrow rail; pushing the hardware higher just leaves it crammed against the panel. If the rail is under 2″, stay with classic placement.
Old House Rules: Cabinet Hardware Edition
Consider these Old House Rules your hardware placement guide-at-a-glance.
Paneled doors: align hardware with the frame corner (classic) or slightly higher on the frame (modern tension). Pick one and use it everywhere.
Slab doors: 2.5–3″ from the corner, knobs or pulls.
Drawers under 24″: single hardware, centered or with modern tension.
Drawers 24″ and over: one pull at 1/3 the drawer width, or two pulls centered on the quarter-points.
Use the same hardware type within a stack of drawers.
Consider backplates whenever drill holes don’t match, the hardware reads thin, or the cabinet finish needs protection.
My final thoughts on cabinet hardware: this is just the beginning.
Cabinet hardware placement and style is that small detail that will noticeably influence how finished a room feels.
Using consistent placement and choosing hardware with “just right” weight and proportion helps cabinets feel intentional and balanced. Even when you can’t rip out what you hate and start over with a full renovation.
But there’s so much more to great hardware we didn’t cover. Like how to choose your metals (I get into this in How to Choose: Chrome vs Brass in an Old House), non-traditional hardware, and how to work with what you’ve got while you source what you really want (stay tuned for these ones).
Shop this story
Some links may be affiliate links, meaning I may earn a small commission at no cost to you. I only share products I genuinely like, would use in my own home, or have researched and feel confident recommending.
- Cabinet Hardware Jig 3 THOUSAND REVIEWS and a 4.5 star rating tell me this jig will make installing cabinet pulls and handles easier for you
- Knobs for a classic foundation
- Antique Brass 1.1 Inch Knurled Brass Knobs I love knurled anything. These have great reviews and a classic look
Antique Brass 1.2 Inch Cabinet Knobs these are about as classic as you can get. Not boring. Familiar and homey.
- Antique Brass 1.1 Inch Knurled Brass Knobs I love knurled anything. These have great reviews and a classic look
- Clean, versatile cabinet pulls
- Antique Brass Cabinet Handles A 6-pack with great reviews and a very traditional look – very much in line with our house’s original 1924 window hardware
- Antique Brass Cup Pulls Bin Cup Drawer Pulls come in longer sizes, too, for oversized drawers. The messy cook in me loves these
- Bronze Knurled Solid Brass Cabinet Handles You had me at knurled. I love the nubbly feeling of knurled knobs. These ones bring some modern tension
- Massey Drawer Pull, Rejuventation are what I’ve got in the laundry room. And I love them completely
- Backplates I admire
- Top Knobs Handle/Pull Backplate comes in an assortment of finishes and is simple, solid, and classic
- Maymont Rectangle Oil-Rubbed Bronze Cabinet Pull Backplate is another simple, clean, and classic looking backplate for pulls in a number of finishes
Where should cabinet pulls be put on shaker doors?
Shaker (and other paneled) cabinet pulls go on the cabinet frame — either at the corner (classic placement) or 1–2 inches higher on the rail (modern tension placement). Pick one and use it on every paneled door in the room. Mixing placements is the most common mistake in DIY hardware projects.
How do you measure for cabinet hardware placement on slab doors?
Slab cabinet doors don’t have a frame, so placement gets measured from the door’s corner. The standard is 2.5–3 inches in from the corner, both vertically and horizontally. The same rule applies to knobs and pulls. Closer than 2.5″ feels cramped; more than 3″ reads off-balance.
Can you mix knobs and pulls in the same kitchen?
Absolutely! A common rule is knobs on cabinet doors, pulls on drawers. The mistake to avoid is mixing knob and pull within the same surface category (some doors with knobs, others with pulls; or some drawers with knobs, others with pulls). Pick one rule per surface category (door or drawer) and apply it consistently.
Are cabinet hardware backplates worth it?
They sure are! Backplates solve five problems: covering mismatched drill holes from previous hardware, adding visual weight to thin hardware, protecting cabinet finish from wear, refreshing an old kitchen without full replacement, and adding period authenticity. I consider backplates one of the lowest-effort, highest-impact cabinet hardware moves.